Tutorial
The purpose of this tutorial is to introduce the nexxT framework from different perspectives. We start with the perspective of a user who wants to be able to use predefined configurations. Then we show the perspective of an integrator who creates and manipulates configurations of filter graphs using nexxT. The last perspective is the developer view who develops filters ready to be integrated into the framework accessing both the python and the C++ API.
nexxT Nomenclature
Terms and definitions: A nexxT configuration provides one or more applications. Applications consist of a directed graph where the nodes are filter instances. Filter instances have input and output ports. Edges from output to input ports represent data flow connections. The filters can provide properties which can be manipulated in the GUI. For a clearer view it is possible to group subgraphs in so-called composite filters.
User Perspective
After installing nexxT as described in the Installation section, the command nexxT-gui is available in the virtual environment. Starting it with
$ nexxT-gui
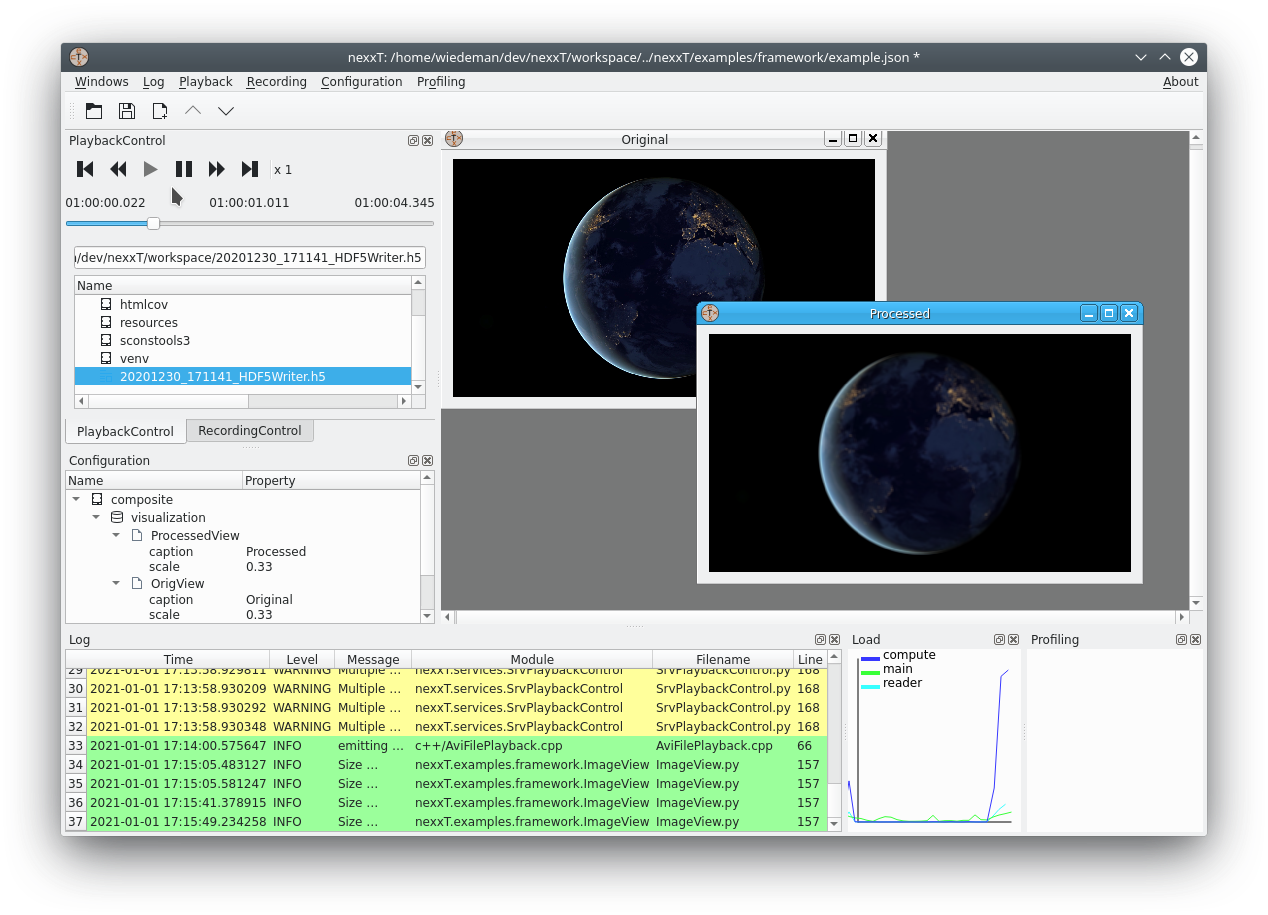
brings up the nexxT graphical user interface:
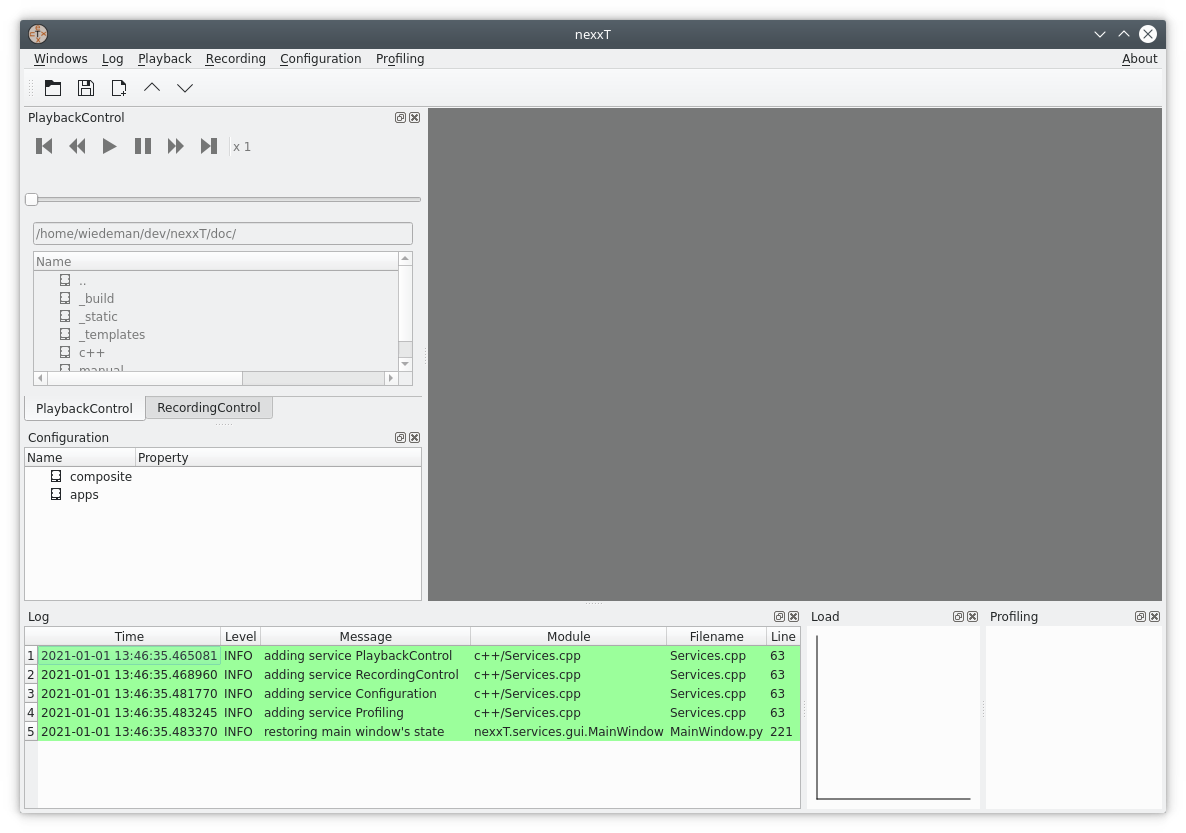
GUI walkthrough
The GUI consists of a main window with a menu, a toolbar and several dock windows. We are going to walk through the provided functionality briefly:
The Configuration dock window and the Configuration menu are the main places where the user interacts with the configuration. It is possible to load and save configuration files, start and stop applications, modify property values and also manipulate the underlying filter graph.
The Playback Control dock window and the Playback menu are the places where the user browses for files and activates them for playback. The window is enabled only if an application with a playback filter is active. It also provides the familiar control elements for navigating through a data file.
The Recording Control dock window and the Recording menu provide control for recording data. The window is enabled only if an application with a recording filter is active.
The Log window contains messages from both nexxT itself and the active plugins. It can be configured through the Log menu.
The Load window shows the workload of the threads used in the application (when applications are active).
The Profiling window shows detailed filter timings if enabled through the Profiling menu.
Example configuration
The example configuration is installed in site-packages/nexxT/examples/framework/example.json (the site-packages folder is inside the virtual envirnment where you have installed nexxT). This file contains two applications live and sim and a composite filter visualization. You can inspect the filter graphs by right-clicking the item in the configuration view and selecting Edit Graph:
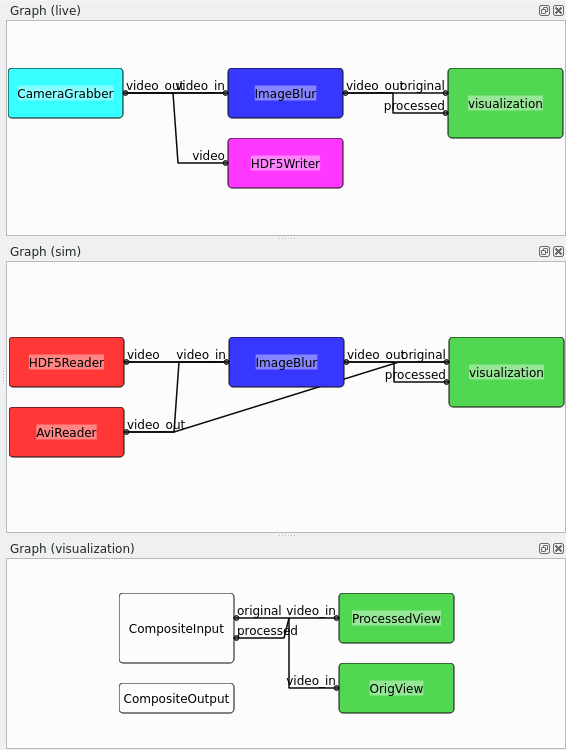
The live application contains a camera grabber, an image processing filter, an HDF5 recorder and the visualization. The different colors in the graph are related to the different threads the filters run in. This application is ment to be executed live with a real camera. The CameraGrabber uses the first camera found on the system with default settings.
The sim application contains two readers for different flavours of input files (HDF5 or standard avi or mp4 containers), also the image processing filter and the visualization. This application is ment to be executed offline with data from disk. This allows to experiment with parameters and other algorithms.
The image processing here is a placeholder for a computationally expensive operation. The blurring is implemented in a non-optimal way for the benefit of minimizing project dependencies. One would obviously use libraries such as opencv or scipy for performing this task in a productivity environment.
Executing the live application
Right-clicking
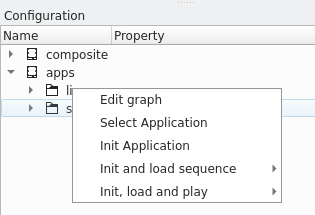
on one of the applications shows different options for activating the application:
Context menu entry |
Effect |
|---|---|
Select application |
Application is selected but left uninitialized |
Init application |
Application is initialized. A Playback file is not yet selected. |
Init and load sequence |
Application is initialized and the selected playback file is loaded. Playback is not yet started (only relevant for playback apps) |
Init, load and play |
Application is initialized and the selected playback file is loaded. Playback is started (only relevant for playback apps) |
Execute Init application of the live configuration. If a camera is connected to your computer, you should see two images, the original image as delivered from the camera and the processed, blurred image from the image processing filter.

The load monitor shows the load of the individual threads. In this example, the load introduced by the image processing is significant - the blue line is nearly always 100 %. This means that the image processing filter is probably slowing down the processing of the graph.
You might also see some warnings in the log monitor. They come from the QMultimedia framework package which is used to grab the images. Note that this choice has been made for demonstration purposes only and it minimizes the project’s dependencies. In a productivity environment, the capturing filter might be replaced with a wrapper around a better suited library (e.g., opencv).
You are now able to take a recording using the buttons of the Recording Control toolbar.
You can also change properties in the configuration view. In the example above, the scale property of the visualization filters has been changed to better fit to the screen dimensions. Note that there are settings with an immediate effect (e.g., scale) while other settings need a re-initialization of the application before taking effect (e.g., caption). It’s up to the filter developer to decide about the effect of changed properties.
Executing the sim application
Clicking on the deinitialize
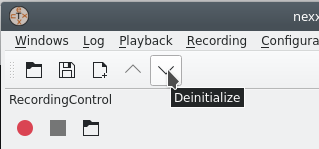
button on the toolbar sets the gui into the uninitialized state. You can now start the sim application to replay the recording you’ve just made. Therefore, right-click on the sim application and execute Init application. The Playback Control window is activated now and you can navigate to the .h5 file recording. When the file is activated in the browser, the Play button is enabled. Click it to start the playback from the recording.
In principle it shall be possible to also play .mp4 files with this application. Due to the limitations of the QMultimedia framework package the supported file types are limited.
Integrator Perspective
The integrator’s perspective on the nexxT framework is to maintain and modify existing or create new configurations. The integrator uses ready-to-use plugins from developers (i.e., it is not strictly necessary to have programming skills for performing this task). The main tool for achieving these tasks is the Graph Editor (see Example configuration). In the next paragraphs, we show how to create a new configuration:
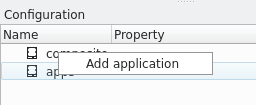
Click on the New config button in the toolbar and choose an appropriate location. Right-click the apps entry in the Configuration dock window and choose Add application:
You can change the name of the new application by pressing F2 in the configuration view. Start the graph editor of this application. The graph will be empty, and we are going to populate it. Right-clicking on an empty space in the graph editor brings up this pop-up menu:
As you can see, there are multiple options to add filters:
Context menu entry |
Effect |
Discussion |
|---|---|---|
Add filter from file |
You can choose a python file or a shared object / DLL. This file will be scanned for Filter classes and a list of available filters will be presented. In case a python file is created, this file is imported as a python module. |
While this method is pretty easy and straight-forward, importing python code like this doesn’t scale up. It is recommended that filters are imported by one of the two other ways. As of today, nexxT uses an absolute path to the file. After saving a config, it might be necessary to change these paths in the JSON file to be relative to the configuration file. |
Add filter from python module |
You can choose a python module from the current python environment (dot notation can be used for packages). |
This method is preferrable over the file method, if your filter is packaged in a standard python package which is installed via pip or similar tools. However, integrators have to remember the python module names of their filters. |
Filter Library |
Filters which are registered with the ‘nexxT.filters’ entry point (see |
Most convenient approach for integrators. The method requires that the filter is installed with the correct entry_point definition in setup.py or setup.cfg. |
Let’s add a HDF5 reader to the application, using the filter library (Filter Library -> harddisk -> HDF5Reader). You will be presented with an empty filter:
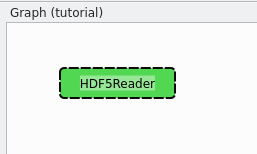
The HDF5 reader uses the concept of dynamic ports for being able to support arbitrary streams. These dynamic ports have to be defined by the integrator. Filters and ports provide context menus where dynamic ports can be added, removed and renamed. Each stream in the HDF5 file is then mapped to a dynamic output port with the name of the stream. The HDF5 reader can suggest port names from a template HDF5 file. Therefore, click on Suggest dynamic ports … and choose the HDF5 file which was recorded in Executing the live application. You are presented with this suggestion:
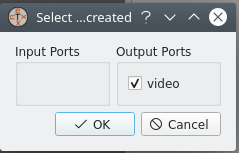
After acceptance, the video port is added to the filter. Another way to achieve the same effect is to use the filter’s context menu and add a new dynamic output port with name video.
By default, new filters are running in the main thread (indicated by the green color). However, the HDF5 reader is designed to run in a seperate thread instead and it will emit a warning in the logs if it runs in the main thread. Therefore, we assign a new thread reader to it using the filter’s context menu. Note the color change after the operation.
Next, we will add the visualization node for the video stream to the graph editor (Filter Library -> examples -> framework -> ImageView). The green color indicates that this filter is running in the main thread. Visualization filters are required to run in the main (aka GUI) thread, because of QT’s requirements for gui elements. This filter defines some properties which can be changed in the configuration view, namely scale and caption.
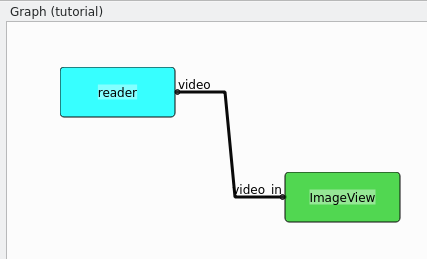
We can now connect the reader’s output port with the visualization’s input port by dragging a connection between the two:
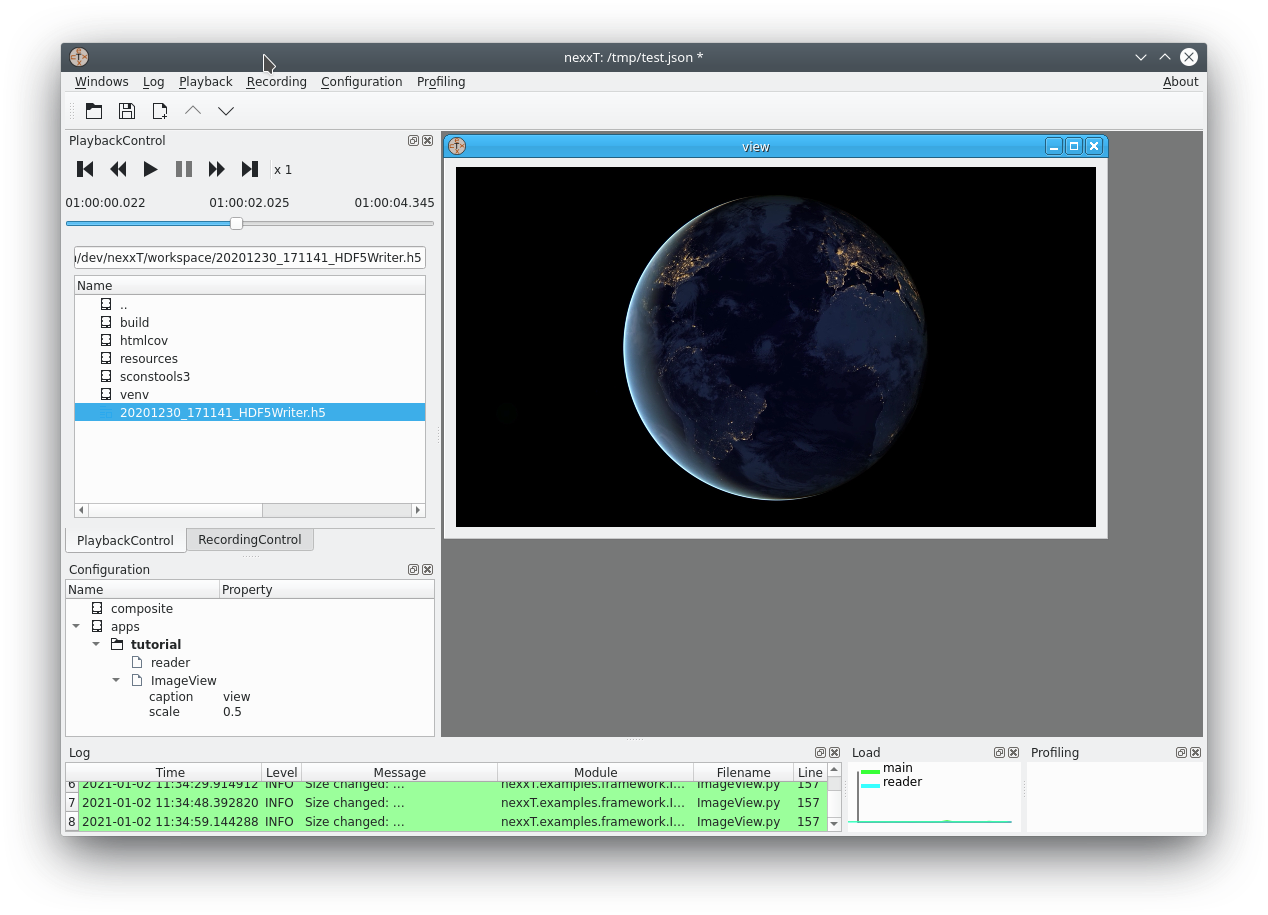
Now it’s time to save the configuration in the tool bar and test it. Initialize the application with the context menu in the configuration view and choose the .h5 file from the previous section. You should see the recorded data:
Properties and Variables
Filters may publish configuration options with the property subsystem. Properties have an associated type (float, int, string, bool) and filter developers might add constraints like minimum or maximum value, string enums, etc. The properties can be set in the GUI in the Configuration dock window under the respective filter instance.
Starting with version 1.1.0, optional variable substitution was introduced into nexxT. Variables can be defined in the Configuration dock window either globally for the whole configuration or at instances of composite filters. For example, if a sensor is connected via ethernet, it might be useful to define a global variable IP and reference the IP address in filters indirectly via the variable. When the IP address changes, it only needs to be changed once in the configuration and the change propagates to all filters where the $IP is used. Another use case is the definition of composite filters which are configured by variables defined at the instances of the filter.
Variable substitution in filter properties must be turned on explicitely by setting the indirect flag in the configuration window.
Variable substitution behaves similar to shell variable substitution. In addition, variables may be set to the special syntax ${!<python expression>} to expand to the value of the given python expression. Note that these expressions cannot be embedded in longer substitutions, but need to be assigned to standalone variables. Expressions have access to the importlib module, so they can use installed python packages and the standard library. The subst(...) function can be used to substitute strings with other variables.
Here are some examples:
VAR=hello $WORLD,WORLD=world; both$VARand${VAR}will expand recursively to the string"hello world".if a variable is defined in multiple levels (e.g. globally and in a composite filter instance), the definition of the innermost level will be used.
FIVE_PLUS_NINE_RES=${!5+9}will expand to"14".FIVE_PLUS_NINE=five plus nine is $FIVE_PLUS_NINE_RESwill expand to"five plus nine is 14"FIVE_PLUS_NINE_FAIL=five plus nine is ${!5+9}will expand to"five plus nine is ${!5+9}", since the python expression substitution works only for standalone variables.USE_MATH=${!importlib.import_module('math').sqrt(int(subst('$FIVE_PLUS_NINE'))}will expand to"3.7416573867739413". Note that recursive variable substitution needs to performed explicitely using thesubst(...)function.
Thread cycles and Deadlocks
When you get error messages like
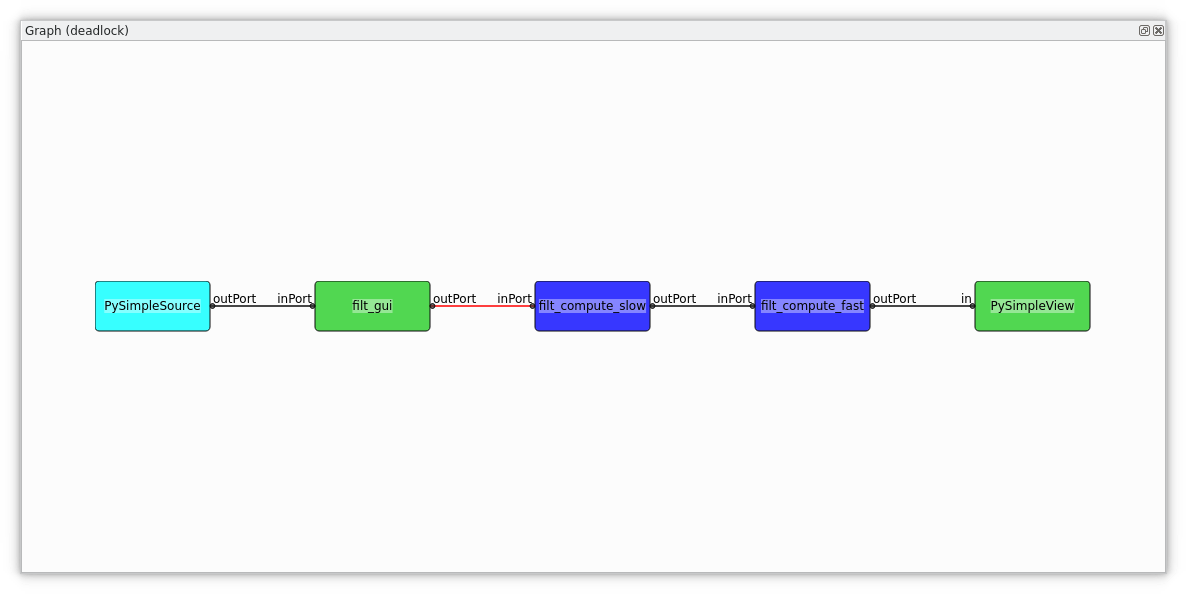
nexxT.core.ActiveApplication: This graph is not deadlock-safe. A cycle has been found in the thread graph: main->compute->main
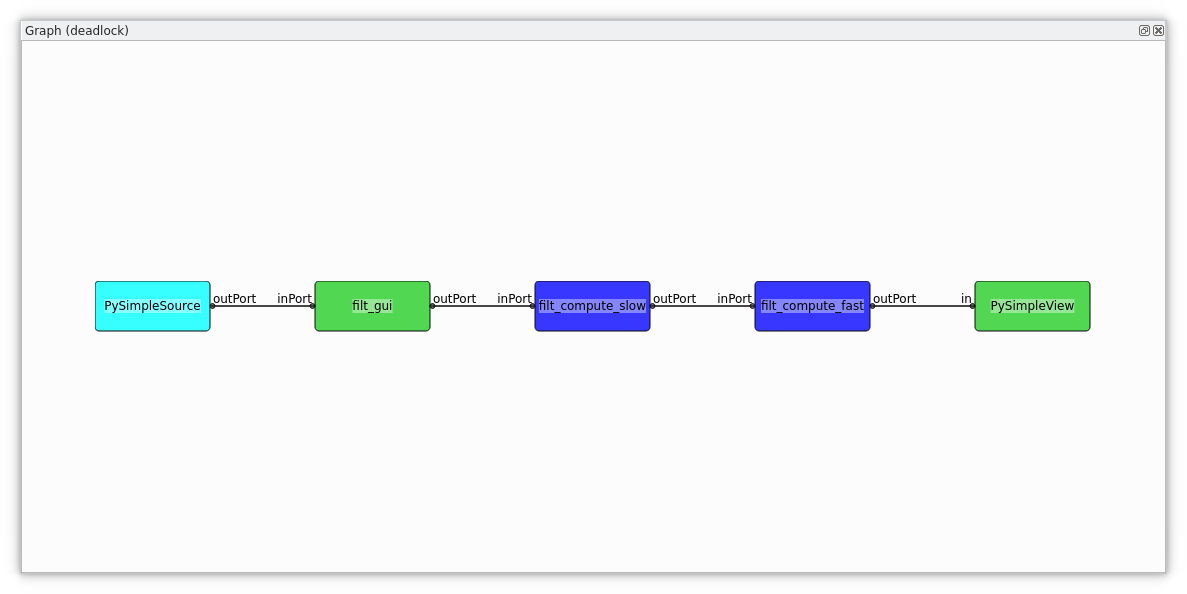
you have tried to create an application which is potentially deadlocking. In the message above, it is stated that there is a dependency cycle in the filters of the threads main and compute. This is the corresponding filter graph:
The reason for the possible deadlocks is that nexxT by default uses a semaphore to control the number of pending samples in inter-thread connections. When transmitting a sample to another thread which has not yet processed the last transmitted sample, the transmitting thread blocks until the last transmitted sample has been received by the receiving thread. This behaviour might cause deadlocks in the presence of cycles, nexxT detects these cycles and refuses to execute these applications.
There are multiple solutions for this issue:
move filters to other threads. The above examples gets deadlock safe when moving the filter filt_gui from the gui thread (green) to the compute thread (dark-blue).
Moving all filters to the main thread is always a solution, but this might be too slow.
Use non-blocking connections for specific inter-thread connections (right-click on a connection and select Set non blocking). Non-blocking connections do not check for pending data samples, so they cannot cause deadlocks. Non blocking connections are displayed in red in the filter graph:
Note that non-blocking connections come with the risk that a potentially infinite amount of data is pending on inter-thread connections. This might cause high latency or even out-of-memory situations. Therefore, non-blocking connections are not recommended to be used at high data rate connections. Output ports triggered by sporadic events are best suited for non-blocking connections.
Developer Perspectives
One of the first things to decide when using nexxT is the data format to be used in the configuration files. There are a lot of possible choices, each with some pros and cons. A fundamental requirement on the data format is that the serialization and deserialization operations shall be efficient. This is because the data is passed between filters in the serialized format and so these operations are heavily used while running a filter graph. The following (incomplete) table gives some hints on how data may be represented:
Method |
Pros |
Cons |
|---|---|---|
pickle |
|
|
|
|
|
ctypes |
|
|
For this tutorial, we decided to use the ctypes approach. Here at ifm we are using a proprietery data format which is also heavily using ctypes in the python world but doesn’t show the cons of the pure ctypes approach listed above.
Python
Data Format
The data format is defined in the module nexxT.examples.framework.ImageData. It consists of the ImageHeader definition and two methods for deserializing and serializing images.
class ImageHeader(ct.Structure):
    """
    The QByteArray starts with this header and the rest of the array is the actual image data
    according to the format given here.
    """
    _fields_ = [("width", ct.c_uint32),    # the width in pixels
                ("height", ct.c_uint32),   # the height in pixels
                ("lineInc", ct.c_uint32),  # the number of bytes per line (including padding for alignment)
                ("format", ct.c_char*32),  # the image format as a c string. See above ImageFormats for a list.
               ]
The image data format is very simple, first there is a data header with image meta information followed by the raw image data buffer.
The deserialization operation converts the so-defined data into a numpy array, usually without copying the data. In nexxT, QByteArray instances are used to pass data around, so the input argument of the deserialization operation is a QByteArray instance.
def byteArrayToNumpy(qByteArray):
    """
    Interpret the input instance as an image and convert that to a numpy array. If the alignment is ok, then this
    operation is a zero-copy operation, otherwise one copy is made.

    :param qByteArray: a QByteArray instance
    :return: a numpy instance
    """
    # efficient zero-copy cast to a python memoryview instance
    mv = memoryview(qByteArray)
    # interpret the ImageHeader structure from this buffer (zero-copy)
    hdr = ImageHeader.from_buffer(mv)
    # convert the format bytes instance to a string
    fmt = hdr.format.decode()
    # sanity check
    if not fmt in ImageFormats:
        raise RuntimeError(f"Unknown image format {fmt}")
    # get number of channels and the numpy dtype of the target array
    numChannels, dtype = ImageFormats[hdr.format.decode()]
    # calculate the number of bytes per pixel
    bpp = dtype().nbytes*numChannels
    if hdr.lineInc % bpp != 0:
        # there is a non-convertable padding at the end of the lines, so we have to fix that
        # first interpret the image data as a numpy uint8 buffer (zero-copy)
        tmp = np.frombuffer(mv, dtype=np.uint8, offset=ct.sizeof(hdr))
        # reshape to 2D with with lineInc as width
        tmp = np.reshape(tmp, (-1, hdr.lineInc))
        # crop the non-aligned padding bytes from the image,
        tmp = tmp[:, :(hdr.lineInc//bpp)*bpp]
        # we have to create a copy here (the frombuffer call does not work on memoryview(tmp))
        mv = bytes(tmp)
    # create the target array
    res = np.frombuffer(mv, dtype=dtype, offset=ct.sizeof(hdr))
    # reshape to requested dimenstions
    return np.reshape(res, (-1, max(1,hdr.lineInc//bpp), numChannels))
The key for the zero-copy operation is to use memoryview(…) together with python’s buffer protocol to access data.
Similar ideas are used in the serialization implementation where only one copy of the data is made before passing it to the framework.
def numpyToByteArray(img):
    """
    Convert a numpy image to the corresponding QByteArray (and make a copy).

    :param img: a numpy array instance with 2 or 3 dimensions
    :return: a QByteArray instance
    """
    # make sure that img is a contiguous array
    img = np.ascontiguousarray(img)
    # allocate the result
    res = QByteArray(img.nbytes + ct.sizeof(ImageHeader), 0)
    # create a memory view
    mv = memoryview(res)
    # map the header into this view
    hdr = ImageHeader.from_buffer(mv)
    hdr.width = img.shape[1]
    hdr.height = img.shape[0]
    hdr.lineInc = img[0, ...].nbytes
    # select the format
    if img.dtype is np.dtype(np.uint8):
        hdr.format = b"intensity_u8" if len(img.shape) < 3 else b"rgb_u8"
    if img.dtype is np.dtype(np.uint16):
        hdr.format = b"intensity_u16" if len(img.shape) < 3 else b"rgb_u16"
    if img.dtype is np.dtype(np.uint32):
        hdr.format = b"intensity_u32" if len(img.shape) < 3 else b"rgb_u32"
    if img.dtype is np.dtype(np.float32):
        hdr.format = b"intensity_f32" if len(img.shape) < 3 else b"rgb_f32"
    if img.dtype is np.dtype(np.float64):
        hdr.format = b"intensity_f64" if len(img.shape) < 3 else b"rgb_f64"
    # assert reasonable shape
    assert len(img.shape) == 2 or (len(img.shape) == 3 and img.shape[2] == 3)
    # map the image data into the view
    tmp = np.frombuffer(mv, img.dtype, offset=ct.sizeof(hdr))
    # assign the pixels
    tmp[...] = img.flatten()
    return res
A first simple filter
Having the data format defined, we can go on and show how to write a simple filter. The nexxT.examples.framework.ImageBlur.ImageBlur filter has one static input and one static output port. It applies a blurring operation with an adjustable filter size.
class ImageBlur(Filter):
    """
    A filter providing the parameter kernelSize. A box filter of this size is applied to the input image
    and the output is transferred over the output port.
    """
    def __init__(self, env):
        super().__init__(False, False, env)
        # add the input port for the filter
        self.inPort = self.addStaticInputPort("video_in")
        # add the output port for the filter
        self.outPort = self.addStaticOutputPort("video_out")
        # define the kernelSize property
        pc = self.propertyCollection()
        pc.defineProperty("kernelSize", 3, "Kernel size of a simple blurring kernel", options=dict(min=1, max=99))

    def onPortDataChanged(self, port):
        """
        Overloaded from Filter base class. The method is called whenever new data arrives at an input port.
        :param port: the port which has new data.
        :return:
        """
        if port.getData().getDatatype() == "example/image":
            # we don't (want to) have scipy or opencv in the dependency list, so we do that by hand, it is just a
            # showcase
            ks = self.propertyCollection().getProperty("kernelSize")
            # assert odd kernel size
            ks = (ks//2)*2 + 1
            if ks > 1: # non-trivial size ?
                # efficient (zero-copy) conversion
                in_img = byteArrayToNumpy(port.getData().getContent())
                # apply the filter
                res = boxFilter(in_img, ks)
                # create a DataSample instance to be transferred over the port
                sample = DataSample(numpyToByteArray(res), "example/image", port.getData().getTimestamp())
            else:
                # filter is no-op, we reuse the input data in this case
                sample = port.getData()
            # finally transmit the result
            self.outPort.transmit(sample)
The constructor creates the ports and defines the kernelSize property. The onPortDataChanged method is called from nexxT whenever new data arrives at the input port.
Note that nexxT always takes care about using the filter’s thread for callbacks like onPortDataChanged(…), unless explictely otherwise stated in the documentation. A manual synchronization for data consistency shall not be necessary in a filter. That was one major drawback of our previous framework and the source of hard-to-find deadlocks and segmentation faults.
NexxT manages the lifecycles of the filters using a state machine. The onPortDataChanged(…) callback is executed after filters have reached their ACTIVE state. NexxT also ensures that no data samples are lost during initialization of the application or because some filters are slow.

Slow filters will slow down the whole filter graph. This is a major difference to ROS and ROS2 where data samples are discarded by default in favour of real-time performance, which results in difficulties getting reproducable results when developing potentially slow algorithms with data from disk.
The constructor and the onInit(…) method of a filter are called not only when executing an application but also when the filter graph is manipulated. For that reason, it is strongly recommended, that these methods are fast. Slow operations shall be delayed until onOpen(…) or onStart(…) is called.
Display filters
Display filters present visualizations of incoming data. They are normal nexxT filter instances. We will shortly walk through the nexxT.examples.framework.ImageView.ImageView filter with a focus on how the filter is written (and not how the display is achieved):
    def __init__(self, env):
        super().__init__(False, False, env)
        # create an input port for receiving the image data
        self.inPort = self.addStaticInputPort("video_in", 1, -1)
        # note that the widget shall not be created directly but in the onOpen(...) function.
        # reason is that the constructor and onInit(...) functions are called quite often and so they should
        # not perform expensive operations.
        self._widget = None
        # define the properties of this filter
        pc = self.propertyCollection()
        pc.defineProperty("caption", "view",
                          "Caption for the MDI window. You can use 2D indices for aligning multiple views\n"
                          "in a grid layout.")
        pc.defineProperty("scale", 1.0, "Scale factor for display", options=dict(min=0.01, max=16.0))
        # we use the propertyChanged signal to synchronize the scale factor.
        pc.propertyChanged.connect(self.propChanged)
The constructor adds the static input port where the images arrive and it defines two properties for the window caption and the scale factor of the view. In this constructor it is demonstrated how to use a slot for getting notified about changed properties.
An important aspect is that the actual widget is not created in the constructor, but the creation is delayed until the onOpen(…) function as already discussed in the previous section A first simple filter.
    def onOpen(self):
        """
        Now we can create the widget.

        :return:
        """
        pc = self.propertyCollection()
        # get the main window service, used for registering the "subplot" in a QMDISubWindow instance
        mw = Services.getService("MainWindow")
        # create the widget
        self._widget = DisplayWidget()
        # register the subplot in the main window
        mw.subplot(pc.getProperty("caption"), self, self._widget)
        # inform the display widget about the current scale
        self._widget.setScale(pc.getProperty("scale"))
In the onOpen(…) function, the display widget is created and registered in the main window. Therefore, it queries nexxT’s MainWindow service and registers the display with the subplot method of the main window. The caption of a mainwindow can optionally include a “[row, col]” definition to layout multiple views in a grid inside a single MDI window.
    def onClose(self):
        """
        Inverse of onOpen

        :return:
        """
        mw = Services.getService("MainWindow")
        # de-register the subplot
        mw.releaseSubplot(self._widget)
        # delete the widget reference
        self._widget = None
The onClose(…) method is the inverse of onOpen(…). It releases the widget from the main window and clears the reference to it.
C++
What are the benefits of using C++ instead of python? While you can argue that performance is not affected much if the filter only uses a wrapper around a library such as opencv, the python GIL is a factor which might limit performance in a multithreaded application like nexxT. In a nutshell it means, that whenever python code is executed, the interpreter has the GIL locked to prevent other threads from modifying interpreter states. C extensions like numpy, opencv or PySide6 unlock the GIL during long-duration calls. As a consequence, heavily using pure python will slow down other threads because the GIL limits parallel execution. Using C++ filters, it is possible to design operations which are not affected by the GIL at all.
Filters in C++ are very similar to filters in python. They are defined using a class inheriting from nexxT::Filter and overwriting the same methods just like in python. One difference is the usage of nexxT services like the MainWindow service (see Display filters). In C++, these services are of type QObject. Therefore, you need to use QMetaObject::invokeMethod for accessing slots of the services.
The plugin library links against the nexxT runtime library (libnexxT.so or nexxT.dll) which is provided in nexxT installation directory. It also links against a QT library used for development. Note that during runtime, the QT library bundled with PySide6 will be used regardless of which QT library has been used to develop. To be on the safe side, you should use a matching major.minor version, the patch level should be non-relevant. For example, to compile a plugin for the PySide6 version 5.14.2.3, you can use QT 5.14.0. Plugin libraries do not use shiboken2 for exposing the filters in python, instead they use a QLibrary interface.
Note that - unlike pure QT - PySide6 does not provide any compatibility guarantees between minor or patch level releases. This means that it is generally not possible to use nexxT with a different PySide6 version than it was compiled against.
Each plugin library can announce one or more filter classes.
Camera Grabber
Again, we will shortly walk through the CameraGrabber class with a focus on how to write a nexxT filter and not how to grab images from a camera. We use the QMultimedia framework for that.
../../nexxT/tests/src/CameraGrabber.hpp/* * SPDX-License-Identifier: Apache-2.0 * Copyright (C) 2020 ifm electronic gmbh * * THE PROGRAM IS PROVIDED "AS IS" WITHOUT WARRANTY OF ANY KIND. */ #ifndef CAMERA_GRABBER_HPP #define CAMERA_GRABBER_HPP #include <QtCore/QObject> #include <QtMultimedia/QCamera> #include <QtMultimedia/QMediaCaptureSession> #include "VideoGrabber.hpp" #include "nexxT/Filters.hpp" #include "nexxT/Ports.hpp" #include "nexxT/NexxTPlugins.hpp" #include "ImageFormat.h" using namespace nexxT; /* This class implements a Grabber for USB camera images using the * QtMultimedia framework. Note that this is not really the ideal * choice because of some known bugs, but it helps to keep dependencies * small. Note that C++ has been chosen here because of two reasons. * First to show how to write a nexxT filter in C++, and second, * because the PySide2 bindings of QCamera and QAbstractVideoSurface * do not allow to do this in python. */ class CameraGrabber : public Filter { Q_OBJECT /* the port where the data will be transmitted to */ SharedOutputPortPtr video_out; /* the camera instance (created at onOpen(...)) */ QCamera *camera; /* the video surface needed to actually grab QImages from the QCamera */ VideoGrabber *videoSurface; /* the capture session */ QMediaCaptureSession *session; public: /* The following line is needed to declare a nexxT plugin. Note that also the following * is needed in a cpp file: * * NEXXT_PLUGIN_DEFINE_START() * NEXXT_PLUGIN_ADD_FILTER(CameraGrabber) * // more filters can be added * NEXXT_PLUGIN_DEFINE_FINISH() * */ NEXXT_PLUGIN_DECLARE_FILTER(CameraGrabber) /* Constructor with standard arguments */ CameraGrabber(BaseFilterEnvironment *env); /* destructor */ virtual ~CameraGrabber(); public slots: /* Slot called from the videoSurface instance when a new image arrives */ void newImage(const QImage &img); /* Slot called by the QtMultimedia framework to detect errors (they will happen!) */ void onErrorOccurred(QCamera::Error error, const QString &errString); protected: // folowing functions are overloaded from the nexxT::Filter API void onOpen(); void onStart(); void onStop(); void onClose(); }; #endif
The CameraGrabber filter is defined in this header file. Because it uses signals and slots we need the Q_OBJECT macro in the class. We also need to call the macro NEXXT_PLUGIN_DECLARE_FILTER for being able to announce this filter in the plugin library.
CameraGrabber::CameraGrabber(BaseFilterEnvironment *env)
    : Filter(false, false, env)
    , camera()
    , videoSurface()
    , session()
{
    /* similar to the python API, we create an output port for transmitting images */
    video_out = SharedOutputPortPtr(new OutputPortInterface(false, "video_out", env));
    /* and register that port */
    addStaticPort(video_out);
    /* note that we do not connect to the hardware in the constructor, this is to be
     * done later in onOpen(...) for efficiency reasons.
     */
    PropertyCollection *pc = propertyCollection();
    QStringList devices;
    for (const QCameraDevice &cameraDevice : QMediaDevices::videoInputs())
    {
        devices.push_back(cameraDevice.description());
    }
    if(devices.size() == 0)
    {
        devices.push_back("dummy");
    }
    pc->defineProperty("device", devices[0], "the camera device", {{"enum", devices}});
}

CameraGrabber::~CameraGrabber()
{
}
The constructors and destructors are straight forward. Long-running operations like camera discovery are delayed until onOpen(…). The constructor passes the BaseFilterEnvironment instance through to the base class just like the python filters do.
/* here we connect to the hardware */
void CameraGrabber::onOpen()
{
    if(videoSurface)
    {
        NEXXT_LOG_WARN("videoSurface still allocated in onOpen");
        delete videoSurface;
        videoSurface = 0;
    }
    if(camera)
    {
        NEXXT_LOG_WARN("camera still allocated in onOpen");
        delete camera;
        camera = 0;
    }
    if(session)
    {
        NEXXT_LOG_WARN("session still allocated in onOpen");
        delete session;
        session = 0;
    }
    /* create a QCamera and a VideoGrabber instance, the camera will run in a default mode
     * All these objects run in the same thread as this filter.
     */
    PropertyCollection *pc = propertyCollection();
    QString devname = pc->getProperty("device").value<QString>();
    for (const QCameraDevice &cameraDevice : QMediaDevices::videoInputs())
    {
        if( cameraDevice.description() == devname )
        {
            camera = new QCamera(cameraDevice, this);
            break;
        }
    }
    session = new QMediaCaptureSession(this);
    if(!camera)
    {
        NEXXT_LOG_WARN("Using default camera.");
        camera = new QCamera(this);
    }
    videoSurface = new VideoGrabber(this);
    session->setCamera(camera);
    session->setVideoOutput(videoSurface);
    /* make up signal/slot connections */
    QObject::connect(videoSurface, SIGNAL(newImage(const QImage &)), this, SLOT(newImage(const QImage &)));
    QObject::connect(camera, SIGNAL(errorOccurred(QCamera::Error, const QString &)),
                     this, SLOT(onErrorOccurred(QCamera::Error, const QString &)));
}

/* at that point, the streaming shall be started */
void CameraGrabber::onStart()
{
    camera->start();
}

/* inverse of onStart(...) */
void CameraGrabber::onStop()
{
    camera->stop();
}

/* inverse of onOpen(...) */
void CameraGrabber::onClose()
{
    if(videoSurface)
    {
        delete videoSurface;
        videoSurface = nullptr;
    }
    if(camera)
    {
        delete camera;
        camera = nullptr;
    }
    if(session)
    {
        delete session;
        session = nullptr;
    }
}
The onOpen(…) method create the necessary classes from the QMultimedia framework and sets up signal and slot connections for receiving new images and error handling. Note that this ensures that the slots are called in the filter’s thread. onStart(…) starts the capturing, onStop(…) and onClose(…) are the inverse functions. Logging can be performed by using the macros defined in Logging.
/* A new image has arrived, we convert this here to a QByteArray
 * Note that QT takes care to call this method in the correct thread
 * due to the QueuedConnection mechanism.
 */
void CameraGrabber::newImage(const QImage &_img)
{
    QImage img = _img; /* we need a writable img */
    ImageHeader hdr;
    QByteArray data;
    /* reserve size for the image in the QByteArray for efficiency reasons */
    data.reserve(int(sizeof(ImageHeader)) + (img.height() * img.bytesPerLine()));
    /* determine the format */
    QString format;
    switch(img.format())
    {
    case QImage::Format_RGB888:
        format = "rgb_u8";
        break;
    case QImage::Format_Grayscale8:
        format = "intensity_u8";
        break;
    case QImage::Format_Grayscale16:
        format = "intensity_u16";
        break;
    default:
        /* for all other formats, we create an rgb_u8 image using QImage functionality */
        img = img.convertToFormat(QImage::Format_RGB888);
        format = "rgb_u8";
    }
    /* fill the header fields */
    hdr.width = uint32_t(img.width());
    hdr.height = uint32_t(img.height());
    hdr.lineInc = uint32_t(img.bytesPerLine());
    std::strncpy(hdr.format, format.toLocal8Bit().constData(), sizeof(hdr.format)-1);
    /* fill the QByteArray instance */
    data = data.append((const char *)&hdr, sizeof(hdr));
    data = data.append((const char *)img.constBits(), hdr.lineInc*hdr.height);
    /* transmit over the port */
    video_out->transmit(
         SharedDataSamplePtr(new DataSample(data, "example/image", DataSample::currentTime()))
    );
}
The newImage(…) slot is called when a new image arrives through the QMultimedia framework. The data is serialized according to Data Format and transmitted over the output pin.
Plugin Definition
For being able to announce the C++ filters, the plugin needs to be defined. This is performed here for the CameraGrabber class and other filters defined in the same library.
/*
 * SPDX-License-Identifier: Apache-2.0
 * Copyright (C) 2020 ifm electronic gmbh
 *
 * THE PROGRAM IS PROVIDED "AS IS" WITHOUT WARRANTY OF ANY KIND.
 */
#include <QtGlobal>
#include "AviFilePlayback.hpp"
#include "CameraGrabber.hpp"
#include "SimpleSource.hpp"
#include "TestExceptionFilter.hpp"
#include "Properties.hpp"

NEXXT_PLUGIN_DEFINE_START()
NEXXT_PLUGIN_ADD_FILTER(VideoPlaybackDevice)
NEXXT_PLUGIN_ADD_FILTER(CameraGrabber)
NEXXT_PLUGIN_ADD_FILTER(SimpleSource)
NEXXT_PLUGIN_ADD_FILTER(TestExceptionFilter)
NEXXT_PLUGIN_ADD_FILTER(PropertyReceiver)
NEXXT_PLUGIN_DEFINE_FINISH()
Debugging
Debugging can be achieved with any IDE of your choice which supports starting python modules (a.k.a. python -m ). The nexxT-gui start script can be replaced by python -m nexxT.core.AppConsole. See specific examples below.
Python debugging with Visual Studio Code
To start with VS Code make sure the Python extension for VS Code is installed (see here).
Open VS Code in your source code directory via menu (“File/Open Folder”) or cd in your terminal of choice to your folder and start VS Code by typing code . (dot for the current directory).
Setting virtual environment
If you’re not using venv, continue to the next section. In case you are using a virtual environment, we need to provide VS Code some information. Open the settings.json file in your .vscode directory (or create it). Your settings should include following information:
{
    "python.pythonPath": "/path/to/your/python/interpreter/python.exe",
    "python.venvPath": "/path/to/your/venv",
    "python.terminal.activateEnvironment": true
}
The paths should be absolute. If "python.pythonPath" is inside your venv, "python.venvPath" is not required, VS Code will recognize it and activate venv automatically.
Note: Make sure that at least one .py file is opened in the editor when starting debugging, otherwise the venv may not be activated (the author does not know exactly under which circumstances this is required, but this information may safe you some time searching the internet when things don’t go as expected).
With these settings at hand, venv will also be started automatically when we create a new terminal in VS Code (“Terminal/New Terminal”).
Configuring launch file
The next step is to create the launch.json file for our debug session (manually or via “Run/Add configuration”). Your launch.json file in .vscode folder should look like this:
{
    "version": "0.2.0",
    "configurations": [
        {
            "name": "Python: Modul",
            "type": "python",
            "request": "launch",
            "module": "nexxT.core.AppConsole",
            "justMyCode": false
        }
    ]
}
The “module” setting is the critical part. Under the hood VS code will invoke python -m <module>.
With the “justMyCode” setting, we can extend debugging to external code loaded by our application.
We’re all set, now we can run our debug session by pressing F5 or the “Run” menu.